Tutorial: How To Use a Headless Browser for Web Scraping
This headless browser tutorial will teach you how to use a headless browser for web scraping and automated data extraction.


Headless browser scraping is popular because headless browsers prioritize speed, can efficiently handle dynamic web pages from modern websites, and are highly customizable—especially compared to traditional automated data extraction techniques.
So how do you use a headless browser for scraping?
This guide will review how and why headless browser scraping became so popular, the pros and cons of headless browser web scraping, and provide a step-by-step tutorial for javascript-based scraping using Headless Chrome and Puppeteer.
What Is a Headless Browser?
A headless browser is a web browser without a graphical user interface (GUI). They can render HTML, CSS, and JavaScript and load images and other media like a normal browser. The only difference is the visual output is not visible to the user.
How Do Headless Browsers Work?
Instead of being controlled through buttons on a GUI, headless browsers are controlled via command-line interfaces or browser automation tools like Puppeteer and Selenium.
What Are Headless Browsers Used For?
Headless browsers are mainly used for tasks that require programmatic interactions with websites. The two most common uses of headless browsers are web scraping/automated data extraction and automated testing, which is often called “headless browser testing.”
This article will talk about using headless browsers for scraping. If you want a deeper dive into how headless browsers work and additional use cases, read our blog, What Is a Headless Browser and What Are They Used For?
The Role of Headless Browsers in Web Scraping
Headless browsers have long been the go-to web scraping method because they’re efficient, fast, low-cost, easy to automate, and can handle dynamic content scraping on difficult-to-scrape websites and platforms. They also can mimic real user behavior, which makes them less likely to be flagged as automation.
How Does Headless Browser Scraping Work?
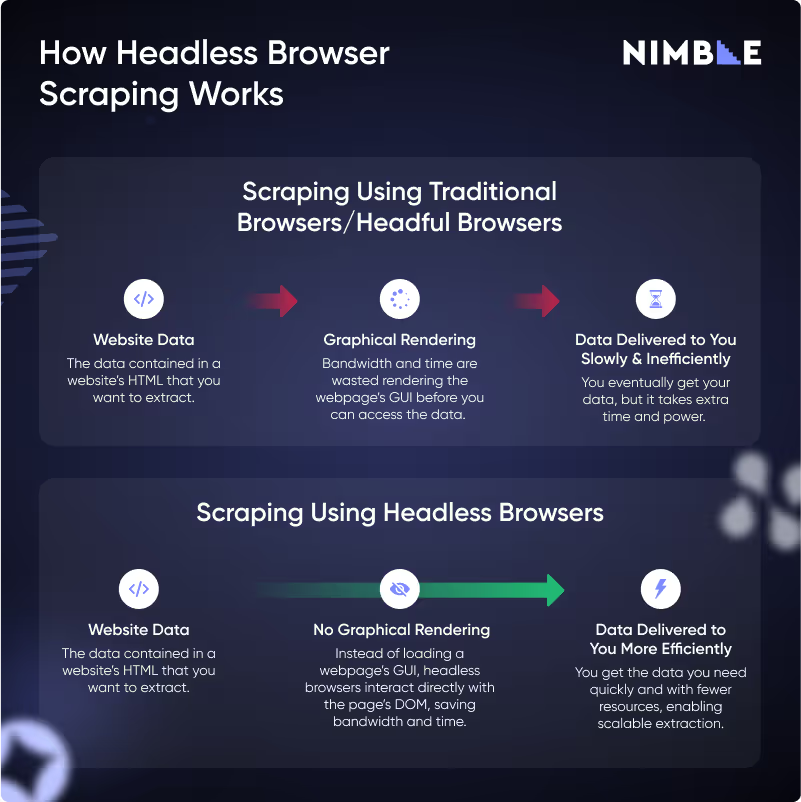
Headless browser scraping is typically executed using browser automation tools like Puppeteer and Selenium. These tools are used to automate scripts that simulate user interactions with the webpage, like clicking buttons, opening new windows, or interacting with dynamic content.
The headless browser loads complete web pages and extracts data by interacting directly with the website's DOM (Document Object Model) rather than wasting bandwidth and time loading a webpage’s entire graphical interface. This makes headless browsers capable of extracting large quantities of data quickly, more efficiently, and at a lower cost than traditional scraping methods.

How Headless Browsers Differ From Traditional Scraping Methods: A Quick History of Data Extraction
Headless browsers were invented to solve a developing problem in data extraction. Here’s a quick recap of how they came to be and why they’re so popular.
Old-School HTML Scraping
Traditional scraping methods typically rely on simple GET requests and static HTML parsers that retrieve raw HTML from a web page and then extract specific data from it afterward—bypassing the need for a browser at all. While this was fast, efficient, and worked brilliantly back when websites were simple and all of a webpage’s data was embedded in the initial HTML, it’s simply not enough on the modern internet.
These days, most websites rely on JavaScript to load or modify content after the initial HTML is delivered—which means GET requests can’t adequately capture all of a webpage's data.
Why Not Use Traditional Browsers?
Without headless browsers, the only way to remedy this is to create scraping scripts that find webpages via traditional browsers like Google Chrome or Safari—but, since this requires loading the full GUI every time you access a webpage, this method is incredibly slow, inefficient, and resource-intensive.
The Solution: Headless Browsers
Enter headless browser scraping. Headless browsers can fully load and interact with web pages and execute JavaScript and CSS the same way a normal browser could. But, since they don’t load the GUI, they’re substantially faster and require fewer resources than scraping with a traditional browser.
This makes them capable of dynamic content scraping and JavaScript-based scraping on complex websites with many interactive and dynamic elements that require user input and navigation without compromising speed and efficiency.
The Benefits and Drawbacks of Using Headless Browsers for Web Scraping
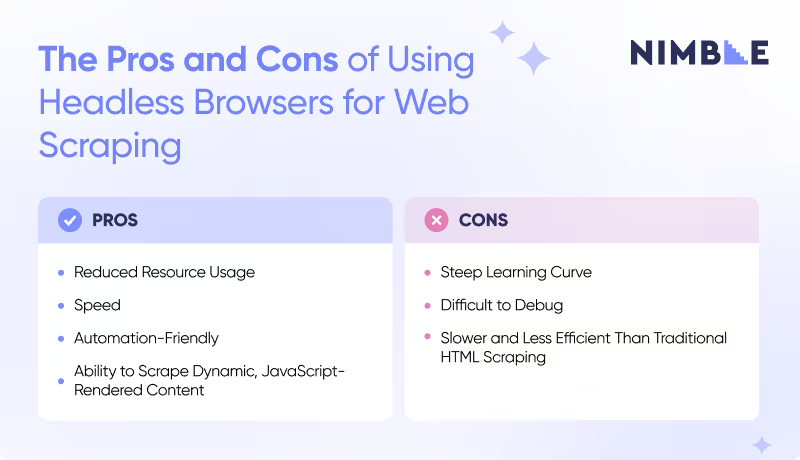
Here are the biggest pros and cons of headless browser scraping compared to using traditional browsers.
The Benefits
Reduced Resource Usage
The lack of GPU means headless browsers consume far less memory, bandwidth, and system resources than traditional browsers. This improves performance on large-scale scraping tasks and enables scalability.
Speed
Because they don’t have the overhead of rendering visual elements, headless browsers can execute commands and extract data faster than traditional browsers.
Automation-Friendly
Headless browsers integrate seamlessly with automation tools, making automating website interactions and data extraction easy.
Ability to Scrape Dynamic, JavaScript-Rendered Content
Websites that rely on JavaScript to render content often can’t be scraped with HTML scrapers and slow down scraping via traditional browsers. Headless browsers can handle such sites effortlessly, ensuring that all dynamic content is captured.
The Drawbacks
Steep Learning Curve
Setting up and configuring a headless browser with automation tools requires more technical expertise than traditional scraping methods.
Difficult to Debug
Without a graphical interface, debugging headless browser issues can be tricky. Developers need to rely on logs and screenshots to identify problems.
Less Efficient Than HTML Scraping (On Simple Websites)
Headless browser scraping is the quickest and most resource-efficient data extraction method on complex modern websites. However, if you need to scrape simple websites without dynamic content, old-school HTML scraping using GET requests is actually faster.

Tutorial: How To Use a Headless Browser for Web Scraping (Headless Chrome With Puppeteer)
Now that you know why headless browsers are used for web scraping, let’s learn how to do it with this headless scraping tutorial.
For simplicity, we will focus on Headless Chrome scraping using Puppeteer.
Tools and Skills You’ll Need
Headless Browser
We’ll use Headless Chrome, the headless version of Google Chrome. This browser is often paired with Puppeteer and is well-known for automating data scraping tasks. For a list of other headless browsers, check out this blog post.
Browser Automation Tool
We’ll use Puppeteer, a Node.js library known for its adeptness at rendering dynamic content and compatibility with Headless Chrome and Chromium. Other browser automation tools include Playwright and Selenium.
Intermediate Knowledge of Programming Languages
Different languages are required for tools. JavaScript is required for Puppeteer and Headless Chrome. All script examples in this tutorial are in JavaScript.
Optional Data Scraping Tools
Although not required, the following tools will make your Headless Chrome scraping more effective:
- Proxies or VPNs: Proxies are essential for bypassing IP bans and anti-scraping measures. Proxies that offer proxy rotation, like Nimble’s residential proxies, ensure you aren’t blocked for sending multiple requests from one IP address.
- Data storage tools: MySQL databases, CSV files, and JSON formats can store your extracted data efficiently.
Step 1: Install and Set Up Headless Chrome
Good news—Puppeteer typically comes with a recent version of Headless Chrome pre-installed, so you can most likely skip this step. If this doesn’t work for you, do the following:
- Download Google Chrome from the official site.
- Activate headless mode via your command-line interface using the following command:
chrome --headless --disable-gpu --remote-debugging-port=9222 https://www.example.comIf the webpage’s HTML output appears in your terminal without a window opening in Chrome, it’s worked.
Step 3: Install and Set Up Puppeteer
Theoretically, you could do simple scraping with just Headless Chrome and the command-line interface. But for complex, large-scale tasks, you need a browser automation tool like Puppeteer. Here’s how to install it.
- Download and install Node.js from the official site.
- Open your terminal and run the following command.
npm install puppeteer- Make a new file called
scrape.js. In it, write the following basic script in Javascript to launch Headless Chrome, navigate to a webpage, and print the page title to your console.
const puppeteer = require('puppeteer');
(async () => {
  // Launch headless Chrome
  const browser = await puppeteer.launch({ headless: true });
  const page = await browser.newPage();
  // Navigate to a website
  await page.goto('https://example.com');
  // Extract the title of the page
  const pageTitle = await page.title();
  console.log(`Page title: ${pageTitle}`);

  // Close the browser
  await browser.close();
})();
- Save the above file and run it using Node.js:
node scrape.jsStep 4. Learn to Handle Dynamic Content
The ability to handle dynamic content on modern websites is one of the biggest benefits of headless browsers. The following scripts configure Puppeteer to handle dynamic content.
Scraping a Page Where Content Loads Dynamically
await page.goto('https://example.com', { waitUntil: 'networkidle2' });The waitUntil: 'networkidle2' option tells Puppeteer to wait until the page has fully loaded, even if it’s rendering JavaScript.
Waiting for Specific Elements to Load
await page.waitForSelector('#dynamic-content');This script ensures you don’t scrape content that hasn’t been fully rendered yet.
Step 5: Set Up Browser Automation Interactions
Some dynamic content only loads after a user interaction. To scrape this content, you can use Puppeteer to simulate user interactions like clicks, form submissions, or scrolling.
Simulating Clicks
To simulate a button or link click, use Puppeteer’s click() function. This will wait for the "Load More" button to appear and then simulate a click, triggering the loading of additional content.
// Wait for the button to load
await page.waitForSelector('.load-more-button');

// Simulate a click on the button
await page.click('.load-more-button');
Filling Out Forms
You can automate form fills and submissions using the type() and click() functions. For example, if you want to enter text into a search box and click the submit button, do the following:
// Type a search query into the input field
await page.type('#search-box', 'Puppeteer');

// Click the search button
await page.click('#search-button');
Scrolling Through Pages
If a website loads additional content as you scroll, you can automate scrolling to the bottom of the page using evaluate():
// Scroll to the bottom of the page
await page.evaluate(() => {
  window.scrollTo(0, document.body.scrollHeight);
});
Handling Dropdowns and Other Interactive Elements
To interact with dropdown menus or other more complex elements, use select(). For example, to select an option from a dropdown:
// Select an option from a dropdown menu
await page.select('#dropdown', 'option_value');
Step 6: Add Configurations To Bypass Anti-Scraping Measures
Many websites use anti-scraping measures that block automated tools and interrupt scraping sessions. Here’s how to fight back against these measures.
Rotating Proxies
Rotating proxies helps you avoid IP bans. You can use a proxy provider and pass the proxy settings to Puppeteer like this:
const browser = await puppeteer.launch({
  headless: true,
  args: ['--proxy-server=http://your-proxy.com:8080']
});
Customizing User Agents
Another way to avoid detection is to change the user agent string to mimic real users. You can do this in Puppeteer with:
await page.setUserAgent('Mozilla/5.0 (Windows NT 10.0; Win64; x64) AppleWebKit/537.36 (KHTML, like Gecko) Chrome/91.0.4472.124 Safari/537.36');
Step 7: Write Your First Web Scraping Script
With the above functions, you can now start putting together your own scraping scripts. For example, here’s a script that will allow you to navigate to a page, wait for elements to load, and extract specific data.
const puppeteer = require('puppeteer');

(async () => {
  const browser = await puppeteer.launch({ headless: true });
  const page = await browser.newPage();

  // Go to the target page
  await page.goto('https://news.ycombinator.com/');

  // Wait for the element that contains the titles to load
  await page.waitForSelector('.storylink');

  // Extract the text of all titles
  const titles = await page.evaluate(() => {
    const elements = document.querySelectorAll('.storylink');
    return Array.from(elements).map(el => el.textContent);
  });

  console.log('Titles:', titles);

  await browser.close();
})();
This script does the following:
- Navigates to the Hacker News homepage.
- Waits for the
.storylinkelements (article titles) to load. - Extracts the titles using
page.evaluate(), which executes JavaScript within the page’s context. - Prints the extracted titles to the console.
Step 8: Data Extraction and Storage
Once you’ve scraped the desired data, you’ll need to extract and store it.
Extracting Data
Use Puppeteer’s page.evaluate() function to extract data from the page’s DOM. Here’s how to extract all the text from a specific element:
const text = await page.evaluate(() => document.querySelector('.my-element').textContent);Storing Data
After extracting the data, you can store it in various formats like CSV, JSON, or databases. For example, you can store data in a JSON file using:
const fs = require('fs');
fs.writeFileSync('data.json', JSON.stringify(data, null, 2));
Alternatively, you can store the data directly in a database using Node.js libraries like mysql or mongodb.
Best Practices for Headless Web Scraping
After setting up your headless Chrome scraping process, you should be mindful of these best practices to ensure your experience is smooth, effective, and compliant.
Errors and Exceptions
Timeouts and Page Load Failures
Websites may take longer than expected to load, so set timeouts for loading pages or specific elements. Puppeteer’s waitForTimeout() function can be used to handle slow-loading elements.
await page.waitForTimeout(5000); // 5-second timeout
Server Response Issues
Errors like 404 and 503 errors indicate that the requested resource is unavailable or restricted. Implement retry logic to automatically attempt the request again.
for (let i = 0; i < retries; i++) {
    try {
        // Your scraping logic
        break; // Exit loop if successful
    } catch (error) {
        console.log(`Attempt ${i + 1} failed: ${error.message}`);
    }
}
Logging Errors for Analysis
Keep track of errors in a log file for later troubleshooting. You can write errors to a file to review patterns or issues using Node.js.
Optimizing Web Scraping
Running Concurrent Sessions
Running multiple browser sessions in parallel can significantly speed up the web scraping process. Puppeteer’s launch() function allows you to create new browser instances for parallel tasks.
const browser1 = await puppeteer.launch();
const browser2 = await puppeteer.launch();
Reduce Unnecessary Requests
Disable images, videos, or CSS to speed up scraping by only loading essential content. You can do this by intercepting requests and blocking specific resource types.
await page.setRequestInterception(true);
page.on('request', request => {
    if (['image', 'stylesheet', 'media'].includes(request.resourceType())) {
        request.abort();
    } else {
        request.continue();
    }
});
Ensuring Legal and Ethical Web Scraping
Respect robots.txt and Terms of Service
Always check a website’s robots.txt file to ensure you’re only scraping pages the website owner says you’re allowed to scrape. Violating a site’s robots.txt or terms of service may lead to bans or legal issues.
Comply with GDPR and CCPA Regulations
If scraping user data, be mindful of GDPR (General Data Protection Regulation) and CCPA (California Consumer Privacy Act) regulations, which govern user privacy. Avoid scraping personal information without permission and respect data privacy.
Avoid Overloading Servers
Practice responsible scraping by limiting requests to avoid straining the server. As a general rule, keep your scraping rate to a minimum and avoid scraping during peak website usage times.
Conclusion: Headless Web Scraping Is Efficient—But There Are Even Better Methods Available
Headless browsers make scraping modern websites much more easy and efficient compared to traditional scraping methods. However, they still require a lot of set-up and a heavy time commitment. If all this headless scraping stuff sounds like a lot of work, we agree—which is why we made an alternative.
Nimble’s Web API seamlessly gathers, parses, and delivers structured data directly to your preferred storage method so you can immediately begin using and analyzing it. With several layers of AI-powered technology that ensure streamlined data collection from even the most hard-to-scrape sites, the Web API is the modern alternative to building a headless scraping method from scratch.
Try it today and get hours of your time back without sacrificing data quality.
Try Nimble’s Web API for Free TodayHeadless browser scraping is popular because headless browsers prioritize speed, can efficiently handle dynamic web pages from modern websites, and are highly customizable—especially compared to traditional automated data extraction techniques.
FAQ
Answers to frequently asked questions
.avif)


.png)


